CL600 - Code Change Guide

Many Codes to Choose From
The CL600 range has been designed so the code can be changed on the door in seconds. The code chamber (models 600, 610 and 620) consists of 13 buttons and a ‘C’ button which is used to re-set the code chamber after an incorrect entry, and must always be used as the first digit of a code. Buttons may only be used ONCE in a code. For example 1212 is NOT possible.
The CL600 ranges code or combination, can be entered in any order or sequence; eg 1234 can be 4321 or 1342 or whatever sequence is most convenient to remember.
With 13 buttons, a total of 8,191 different codes are available, any of which can be entered in any sequence.
The total is arrived at as follows:

Note: Models 605, 615 and 625 have 12 coded buttons giving 4,095 different codes. Most people will set the code in the range of 4 to 7 digits, and the total number of codes in this range is 5,434. The lock is supplied with a random factory set code (see code card). At any time this can be quickly changed to a new code of your choice. Typically codes are 4 to 7 digits long. Shorter codes are possible (1-2 digits) but are not recommended.
Passage Free Mode Models 605, 615 and 625
The above feature can be identified with a black dot on the ‘Z’ button.
To set the lock in passage free mode enter the code followed by the ‘Z’ button. The lock will now be in free passage mode.
To put the lock back into code access only press the passage set ‘Z’ button once followed by the C button.

Code Change Instructions
The CL600 range offers significant advantages over other similar mechanical digital locks by allowing the code to be changed in seconds on the door.
Note: Models 605, 615, 625 only – Before changing code press the ‘Z’ and ‘C’ button to ensure that the lock is not in free passage mode.
1. Choose code.
2. Insert key and turn anticlockwise to stop for right hand hung doors, or clockwise to stop for left hand hung doors. Fig 1.
3. Push the code change tool onto each button in turn, pushing in the buttons approx 2mm (3/32”) turn anticlockwise 180°. All buttons should now be in the non code position.
4. Test that all buttons are in non code position (perform step 6 before testing buttons) then depress the lever handle which should retract the latch. If latch cannot be retracted press ‘C’ button and repeat step 3.
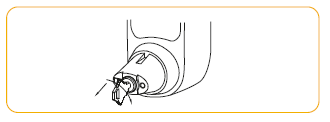
5. To select a button as a code button, push code tool over button. Press in button with tool approx 2mm (3/32”) and turn clockwise 180°. Fig 2.
6. Now turn the key clockwise for right hand hung doors, or anticlockwise for left hand hung doors retracting the latch which will relock the code buttons. Fig 3.
7. Return the key to centre and remove.
8. Before closing door test code.

Removal of front load cylinders to repin or replace with cylinders by a different manufacturer.
1.Remove handle and cylinder cover.

2.Turn Key 90° anticlockwise and remove the cylinder from boss

3.To replace cylinder, reinsert and turn 90° clockwise. Replace the cylinder cover and handle.
*If intending to use a cylinder from a different manufacturer it is advisable to confirm beforehand that the new cylinder will fit the boss.
Note that the CL600 uses a 6 pin screw cap cylinder.
If using a screw cap cylinder other than supplied, the tail piece from the Codelocks screw cap cylinder will need to be fitted as follows:
4.Hold down the control pin in the end of the cylinder and unscrew the cap.
Caution! Do not insert the key in the cylinder once you have removed the screw cap!

5.Refit the tailpiece, hold down the control pin and screw the cap on fully without tightening. Ensure the control pin projects to lock the cap.

Test the key operation
If the key is difficult to insert, or tight when turning, then the cap may be too tight. Loosen the cap one notch at a time and try the key again. If the key inserts and turns OK, but is difficult to remove, then the cap may be too loose.
Tighten up the cap one notch at a time.
Adjust the cap until the key inserts, turns and removes easily.
Dimensions

Features
■ On door code change in seconds.
■ Code free entry mode (models 605, 615, 625 only).
■ Inside handle always retracts the latch for exit.
■ Weather resistant.
■ Tamper resistant, with stainless steel buttons, and clutch protection if the outside handle is forced.
■ Reversible handles.
■ Easy code change as often as required.
■ Fits doors between 35mm (1 3⁄8”) and 60mm (2 3⁄8”) thick without modification.
Features - Model 620/625 Only
■ Split follower lock enables inside handle to retract latch and deadbolt simultaneously, satisfying ‘means of escape’ requirements for exit at all times. Prevents accidental lock-ins.
■ Deadbolt thrown by key to lock out code users after work hours.
■ Key will retract the latchbolt giving access for admin functions.
■ Double Euro-profile cylinder with 3 keys. Any Euro-profile cylinder may be used.
■ On multiple door installations consideration should be given to having all cylinders keyed alike, with restricted key issue, for ease of management.
Maintenance
No maintenance of the working parts is necessary. DO NOT OIL. To maintain the finish the lock should be cleaned regularly with a soft cloth. A silicone spray or similar should be used to provide a protective film against grit and grime.
CC-CL600-0812
© 2019 Codelocks Ltd. All rights reserved.
Related Articles
KL1100 RFID - Getting Started Guide
ABOUT KL1100 RFID The KL1100 RFID can operate in Standalone Mode or in Remote Card Authorisation (RCA) Mode. RCA Mode gives the ability to remotely set-up and allocate cards to locks or lock groups with our offline or cloud based software. This ...CL160 - Code Change Instructions
Push Button Lock EasyCode CL160 locks can be used at home on doors, garages and garden sheds, and at work in offices, workshops and storerooms requiring restricted access. Available in Silver Grey. Many Codes to Choose From The code chamber consists ...C3 Smart User Guide
Notice: The C3 Smart App replaced the K3 Connect App on February 14, 2023. For more information on how to download, set up and use C3 Smart with your Codelocks Smart Locks, visit: c3smart.net or contact Codelocks Support. Download C3 Smart 1. Search ...C3 Smart User Guide
Notice: The C3 Smart App replaced the K3 Connect App on February 14, 2023. For more information on how to download, set up and use C3 Smart with your Codelocks Smart Locks, visit: c3smart.net or contact Codelocks Support. Download C3 Smart 1. Search ...C3 Smart User Guide
Notice: The C3 Smart App replaced the K3 Connect App on February 14, 2023. For more information on how to download, set up and use C3 Smart with your Codelocks Smart Locks, visit: c3smart.net or contact Codelocks Support. Download C3 Smart 1. Search ...